Making homemade ice cream in a bag is one of the most fun, simple, and science-filled kitchen projects you can try. Whether you’re doing it with kids, teaching a classroom experiment, or simply craving a quick frozen dessert without an ice cream machine, this method delivers creamy results using everyday ingredients and a little shaking power.
In this comprehensive guide, you’ll learn everything you need to know about making ice cream in a bag — from the science behind it to step-by-step instructions, flavor variations, troubleshooting tips, and creative serving ideas.
Why Make Ice Cream in a Bag?
Traditional ice cream requires specialized equipment or long freezing times. The bag method is different. It’s:
- Quick (ready in about 10–15 minutes)
- Affordable
- Fun and interactive
- Educational
- Perfect for small batches
- No machine required
The process uses ice and salt to rapidly lower the temperature around your ice cream mixture, freezing it while you shake. The result? Fresh, creamy ice cream made right before your eyes.
How the Science Works
Before we jump into the recipe, it helps to understand why this method works so well.
When you add salt to ice, it lowers the freezing point of the ice. This process is called freezing point depression. Normally, ice melts at 32°F (0°C). But when salt is added, the ice must absorb more heat to melt, which causes the temperature of the ice-salt mixture to drop even further — often below 32°F.
This colder temperature allows the cream mixture inside the smaller bag to freeze quickly.
At the same time, shaking helps:
- Prevent large ice crystals from forming
- Incorporate air for creaminess
- Freeze the mixture evenly
The combination of salt, ice, and agitation is what transforms liquid cream into smooth ice cream.
Ingredients You’ll Need
This recipe makes about 1 serving. You can double or triple it as needed.
For the Ice Cream Mixture (Small Bag)
- 1 cup heavy cream (or half-and-half)
- 2 tablespoons granulated sugar
- ½ teaspoon pure vanilla extract
For the Ice Bath (Large Bag)
- 3 cups ice cubes
- ⅓ to ½ cup rock salt (or kosher salt)
Equipment
- 1 quart-size zip-top freezer bag
- 1 gallon-size zip-top freezer bag
- Kitchen towel or gloves (optional but recommended)
Make sure you use sturdy freezer bags. Thin sandwich bags may leak or burst.
Step-by-Step Instructions
Follow these detailed steps for perfect results.
Step 1: Prepare the Ice Cream Base
In the quart-size bag, combine:
- Heavy cream
- Sugar
- Vanilla extract
Seal the bag tightly, squeezing out as much excess air as possible. Double-sealing is recommended to prevent leaks.
Gently shake the bag to dissolve the sugar.
Step 2: Prepare the Ice Bath
In the gallon-size bag, add:
- Ice cubes
- Rock salt
Distribute the salt evenly throughout the ice.
Step 3: Combine the Bags
Place the sealed small bag inside the large bag with the ice and salt.
Seal the large bag tightly, removing excess air.
Step 4: Shake, Shake, Shake
Wrap the large bag in a towel or wear gloves to protect your hands from the cold.
Shake vigorously for 5–10 minutes. Move it around constantly. Turn it upside down. Flip it over. Keep the mixture in motion.
After about 5 minutes, check the small bag. If it’s not thick enough, reseal and continue shaking.
You’ll know it’s ready when the mixture has thickened to soft-serve consistency.
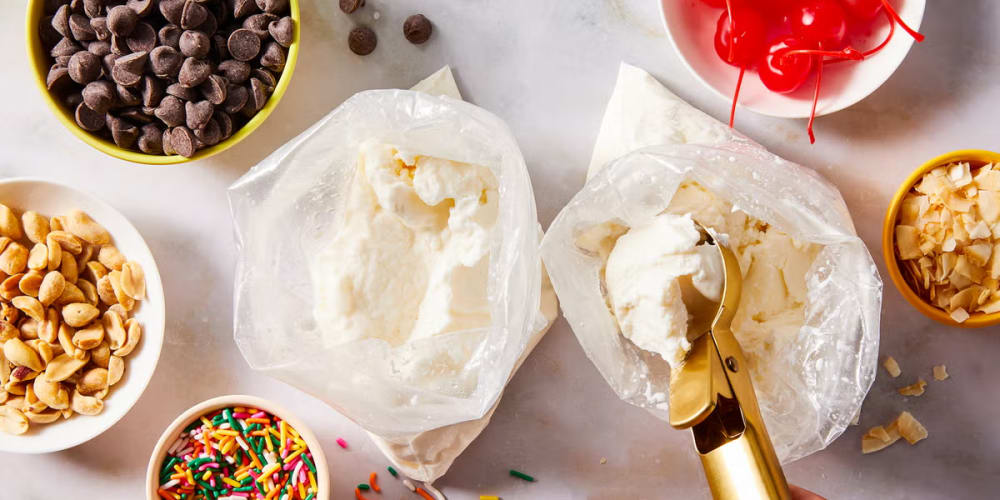
Step 5: Rinse and Serve
Remove the small bag from the ice bath.
Before opening it, rinse or wipe the outside to prevent salty water from contaminating your ice cream.
Open the bag, grab a spoon, and enjoy immediately.
Tips for Creamier Ice Cream
If you want your ice cream extra smooth and creamy, keep these tips in mind:
Use Heavy Cream
Heavy cream has a higher fat content than milk or half-and-half. Fat creates creaminess and reduces ice crystals.
Shake Consistently
Don’t stop shaking for long periods. Constant motion prevents large ice crystals from forming.
Don’t Skimp on Salt
Salt is essential for lowering the temperature. Without enough salt, your mixture won’t freeze properly.
Double Bag It
Leaks ruin the experience. Double-bagging ensures your ice cream mixture stays clean and uncontaminated.
Flavor Variations to Try
Once you master the basic vanilla base, you can experiment with endless flavors.
Chocolate Ice Cream
Add 1–2 tablespoons cocoa powder or chocolate syrup to the base before sealing.
Strawberry Ice Cream
Mash 2–3 fresh strawberries and mix into the cream before sealing.
Cookies and Cream
After the ice cream thickens, open the bag and stir in crushed chocolate sandwich cookies.
Mint Chocolate Chip
Add a drop of peppermint extract and mini chocolate chips.
Salted Caramel
Stir in caramel sauce and a small pinch of sea salt.
Peanut Butter
Mix in 1 tablespoon creamy peanut butter before sealing the bag.
Dairy-Free and Vegan Option
You can make a dairy-free version by substituting:
- Full-fat coconut milk for heavy cream
- Maple syrup or coconut sugar instead of white sugar
Follow the same steps. The texture may be slightly different, but it will still be delicious.
How to Store It
Ice cream made in a bag is best eaten immediately. However, if you want to firm it up:
- Transfer to an airtight container
- Freeze for 1–2 hours
Keep in mind that homemade ice cream without stabilizers may become hard if frozen for long periods.
To soften, let it sit at room temperature for 5–10 minutes before scooping.
Common Problems and Solutions
Even though this method is simple, you may encounter a few issues.
Ice Cream Isn’t Freezing
Possible causes:
- Not enough salt
- Not enough shaking
- Ice melted too quickly
- Cream too low in fat
Solution: Add more salt and ice, reseal, and continue shaking.
Ice Cream Is Too Icy
This usually happens if:
- You used milk instead of cream
- You didn’t shake enough
Solution: Use heavy cream and maintain consistent shaking next time.
Bags Leaked
This can happen if:
- Bags are low quality
- Seal wasn’t tight
Solution: Always use freezer-grade bags and double-bag the mixture.
Educational Benefits: A Fun Science Experiment
Making ice cream in a bag isn’t just cooking — it’s chemistry in action.
This activity demonstrates:
- Freezing point depression
- Phase changes
- Heat transfer
- The importance of agitation in freezing
It’s perfect for:
- School science projects
- Homeschool activities
- STEM demonstrations
- Summer camps
Students can measure temperature changes with a thermometer and observe how salt affects melting ice.
Making It a Group Activity
This recipe works wonderfully for parties or classrooms.
For Kids
- Pre-measure ingredients
- Let each child shake their own bag
- Have toppings ready for decorating
For Parties
Set up a DIY ice cream bar with:
- Sprinkles
- Chocolate chips
- Crushed cookies
- Fruit
- Whipped cream
- Caramel sauce
Guests will love customizing their freshly made treat.
Scaling the Recipe
If making multiple servings:
- Prepare individual small bags for each serving
- Use separate ice baths for best results
- Avoid overloading one large bag with too many inner bags
For larger quantities, it may be easier to use a traditional ice cream maker.
Safety Considerations
Although this method is safe and simple, keep these tips in mind:
- Use gloves to avoid cold burns
- Do not taste the salty ice mixture
- Supervise young children
- Ensure bags are tightly sealed
Salted ice can become extremely cold, so handle carefully.
Texture Differences Compared to Machine-Made Ice Cream
Ice cream made in a bag has a slightly different texture from churned ice cream. It’s typically:
- Softer
- More like soft serve
- Less airy
Commercial machines incorporate more air and often use stabilizers for smoother texture.
However, many people prefer the fresh, rich taste of homemade bag ice cream.
Turning It Into a Learning Moment
You can enhance the experience by asking questions like:
- Why does salt make ice colder?
- What happens if we don’t shake?
- How does fat content affect texture?
- What happens if we use different sugars?
This turns dessert into a hands-on science lesson.
Creative Serving Ideas
Don’t stop at a spoonful straight from the bag.
Ice Cream Sandwiches
Spread between two cookies and freeze briefly.
Milkshakes
Blend with a splash of milk for an instant shake.
Sundaes
Top with hot fudge, whipped cream, and cherries.
Ice Cream Tacos
Scoop into waffle cones folded into taco shapes.
Affogato-Style Dessert
Pour hot espresso over a scoop for a delicious contrast.
Frequently Asked Questions
Can I use table salt instead of rock salt?
Yes. Rock salt works best, but coarse kosher salt or even regular table salt can work. You may need slightly more if using finer salt.
How long does it take?
Usually 5–10 minutes of active shaking.
Can I refreeze leftovers?
Yes, but texture may become firmer and slightly icy.
Why does my hand hurt while shaking?
The ice-salt mixture becomes extremely cold. Use gloves or wrap the bag in a towel.
Can I use flavored extracts?
Absolutely. Almond, coconut, coffee, or maple extract all work beautifully.
Why This Method Is So Popular
The ice cream-in-a-bag technique has been popular for decades because it combines:
- Instant gratification
- Minimal ingredients
- Hands-on fun
- Real science
- Delicious results
It’s accessible to almost anyone with basic kitchen supplies.
Final Thoughts
Making homemade ice cream in a bag is more than just a recipe — it’s an experience. With just cream, sugar, ice, and salt, you can create a creamy frozen dessert in minutes. The process is interactive, educational, and endlessly customizable.
Whether you’re teaching kids about science, hosting a party, or satisfying a sweet craving, this method offers a fun and satisfying way to enjoy fresh ice cream without special equipment.
Once you try it, you may find yourself experimenting with new flavors, mix-ins, and techniques. And the best part? Every batch feels like a small kitchen triumph — simple ingredients transformed into something magical through a little shaking and a lot of fun.