Brown is one of the most versatile and essential colors in cooking and baking. From rich chocolate cakes and caramel frostings to gravies and bread crusts, brown adds warmth, depth, and realism to food presentation. While you can easily purchase ready-made brown food coloring at the store, many people prefer making their own at home using simple ingredients.
Whether you’re aiming for a natural option, adjusting shades precisely, or simply working with what you already have in your kitchen, this comprehensive guide will show you exactly how to make brown food coloring step by step.
Why Make Brown Food Coloring at Home?
Before diving into methods, it’s helpful to understand why homemade brown food coloring can be beneficial.
1. Control Over Ingredients
If you prefer natural cooking or want to avoid artificial additives, homemade brown coloring allows you to use ingredients like cocoa powder, coffee, spices, and vegetable-based dyes.
2. Custom Shade Control
Brown isn’t just one color. It can range from light tan to deep espresso. Making it yourself gives you full control over tone and intensity.
3. Convenience
Sometimes you simply run out of brown food coloring in the middle of baking. Mixing your own using primary colors or pantry staples can save the day.
4. Cost-Effective
If you already have red, yellow, and blue food coloring, there’s no need to buy a separate brown bottle.
Now let’s explore the different ways to make brown food coloring.
Understanding Color Theory: The Basics of Making Brown
Brown is essentially a darkened or muted orange. In color theory, you can create brown by:
- Mixing complementary colors (like red and green)
- Combining all three primary colors (red, yellow, and blue)
- Mixing orange with a small amount of blue
Understanding this makes it easier to achieve the exact brown shade you need.
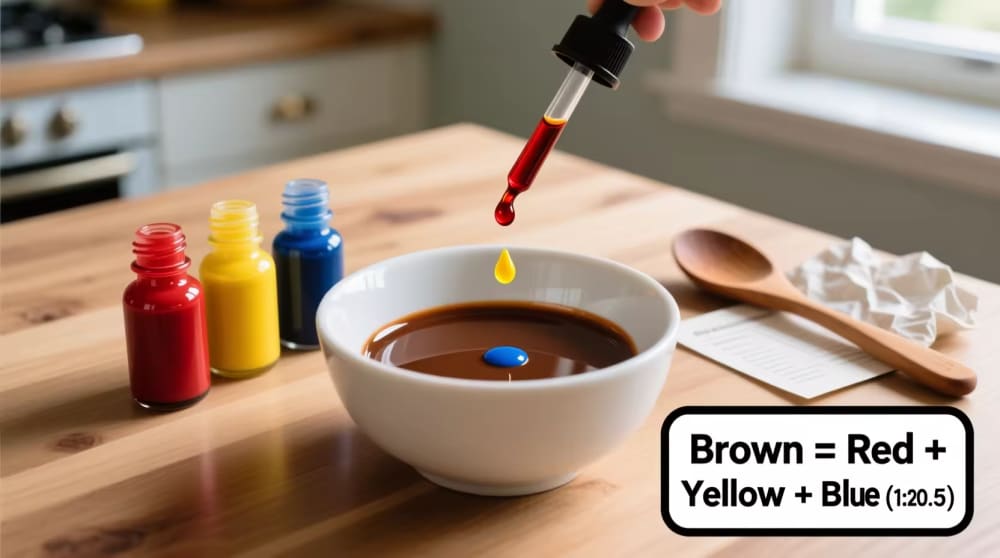
Method 1: Mixing Primary Food Colors
This is the most common and reliable method when using standard gel or liquid food coloring.
Ingredients Needed
- Red food coloring
- Yellow food coloring
- Blue food coloring
- Toothpick or small spoon
- Small mixing bowl
Basic Ratio
Start with:
- 2 drops red
- 2 drops yellow
- 1 drop blue
Mix thoroughly. Adjust gradually.
Adjusting the Shade
- Too red? Add a tiny bit more blue.
- Too dark? Add yellow.
- Too greenish? Add more red.
- Too purple-toned? Add yellow.
Always add color slowly, especially blue, since it’s very strong.
Tips for Gel vs Liquid Coloring
Gel food coloring is more concentrated, so use very small amounts. Liquid coloring may require more drops and can slightly thin your frosting or batter.
This method works best for buttercream, royal icing, fondant, cake batter, and cookies.
Method 2: Mixing Complementary Colors (Red + Green)
If you already have green food coloring, this method is even simpler.
Ingredients
- Red food coloring
- Green food coloring
How It Works
Red and green are complementary colors. When mixed, they neutralize each other and create brown.
Basic Ratio
Start with:
- 1 drop red
- 1 drop green
Mix and evaluate.
Adjusting the Tone
- Too green? Add red.
- Too red? Add green.
- Want a warmer brown? Add a drop of yellow.
- Want a deeper brown? Add a tiny drop of blue.
This method is excellent when coloring frosting or icing where precise tone matters.
Method 3: Using Cocoa Powder
If you are making chocolate-based recipes, cocoa powder is the easiest natural way to create brown coloring.
Best For
- Frosting
- Cake batter
- Pancakes
- Waffles
- Dough
How to Use
Simply add unsweetened cocoa powder to your base mixture until the desired shade is achieved.
Advantages
- Completely natural
- Adds flavor
- Produces a rich, authentic brown
Considerations
- Changes taste (adds chocolate flavor)
- Can thicken mixtures
- Not suitable for recipes where chocolate flavor is unwanted
If you want a lighter brown, use a small amount. For deep brown, increase gradually.
Method 4: Coffee or Espresso
Coffee provides a deep brown color with a slight roasted flavor.
Best For
- Chocolate cake
- Tiramisu
- Brown butter frosting
- Savory sauces
How to Use
Add:
- 1–2 teaspoons brewed espresso
or - A pinch of instant coffee powder dissolved in water
Mix thoroughly.
Advantages
- Natural option
- Enhances chocolate flavor
- Creates deep brown tones
Considerations
- Adds slight coffee flavor
- May thin liquid-based recipes
Use sparingly in frostings to avoid altering texture.
Method 5: Natural Brown Coloring Using Spices
If you want a natural, plant-based option without artificial dyes, certain spices work well.
Cinnamon
Produces a warm, light brown shade.
Best for: cookies, oatmeal frosting, muffins.
Nutmeg
Adds a subtle brown tint.
Best for: cream-based desserts.
Clove (Very Small Amount)
Very strong and dark. Use cautiously.
Turmeric + Cocoa Combination
Turmeric adds yellow tone while cocoa deepens it, creating warm brown hues.
These are ideal when a subtle brown shade is enough and flavor complements the recipe.
Method 6: Caramel or Burnt Sugar
Caramelized sugar creates a beautiful amber-to-dark-brown color.
How to Make Simple Caramel Coloring
- Heat white sugar in a pan over medium heat.
- Allow it to melt and turn amber.
- Stir gently.
- Add a small amount of warm water carefully.
- Cool before use.
This creates a liquid brown coloring perfect for:
- Flan
- Sauces
- Custards
- Frostings
Be cautious, as caramel is extremely hot during preparation.
How to Make Light Brown Food Coloring
For tan or beige tones:
- Use more yellow and less blue.
- Add a tiny amount of brown mixture into white frosting.
- Use a drop of red and yellow only.
For natural methods:
- Use diluted coffee.
- Use small amounts of cocoa powder.
Always build color gradually.
How to Make Dark Brown Food Coloring
To achieve deep chocolate brown:
- Increase blue slightly in your primary mix.
- Add a tiny drop of black food coloring if available.
- Combine cocoa powder with a touch of red food coloring.
- Use espresso instead of regular coffee.
Dark brown often develops over time in buttercream, so allow it to sit for 30 minutes before adjusting further.
How to Make Brown Food Coloring for Different Recipes
Different foods react differently to coloring.
For Buttercream Frosting
Use gel food coloring for best results.
Start light and allow color to develop.
Buttercream darkens slightly over time.
For Fondant
Knead gel coloring into fondant using gloves.
Let rest 10–15 minutes to deepen shade.
For Royal Icing
Use gel coloring and mix thoroughly.
Let air bubbles settle before using.
For Cake Batter
Liquid or gel both work.
Remember the color lightens slightly after baking.
For Savory Dishes
Use caramel, soy sauce (for depth), or coffee depending on recipe compatibility.
Common Mistakes When Making Brown Food Coloring
Adding Too Much Blue
Blue is powerful. Even one extra drop can shift brown toward gray or purple.
Not Mixing Thoroughly
Incomplete mixing results in streaks rather than true brown.
Ignoring Rest Time
Buttercream and icing often darken after resting.
Over-Thinning the Mixture
Too much liquid coloring can ruin frosting consistency.
How to Fix Brown That Looks Wrong
If Brown Looks Green:
Add red gradually.
If Brown Looks Purple:
Add yellow.
If Brown Looks Gray:
Add red and yellow to warm it up.
If Brown Is Too Dark:
Mix into a larger batch of uncolored base.
Storing Homemade Brown Food Coloring
If you made liquid caramel or mixed food dyes:
- Store in airtight container.
- Refrigerate if using natural ingredients.
- Use within one week for best results.
Powder-based coloring (like cocoa or spice blends) can be stored in a dry, sealed container for months.
Natural vs Artificial Brown Food Coloring
Natural Options
- Cocoa powder
- Coffee
- Caramel
- Cinnamon
- Spice blends
Pros:
- No synthetic dyes
- Often add flavor depth
Cons:
- May alter taste
- Limited shade range
Artificial Gel or Liquid Food Coloring
Pros:
- Strong color payoff
- Precise shade control
- No flavor impact
Cons:
- Contains synthetic ingredients
Choose based on your dietary needs and recipe goals.
Frequently Asked Questions
Can You Make Brown Without Blue?
Yes. Mix red and green instead.
Why Does My Brown Look Orange?
You need a tiny bit more blue to neutralize the orange tone.
Can I Use Black to Make Brown?
Yes, but carefully. Add red and yellow first, then a tiny touch of black if needed.
Does Brown Food Coloring Taste Different?
Artificial food coloring has little to no taste. Natural options like cocoa or coffee will affect flavor.
Creative Uses for Brown Food Coloring
Brown coloring is perfect for:
- Tree trunks in cake decorating
- Animal-themed cupcakes
- Wood-textured fondant
- Fall-themed cookies
- Realistic food replicas
- Chocolate-free “mud” decorations
- Skin tones for character cakes
By adjusting ratios, you can create warm caramel tones, cool mocha shades, or deep espresso colors.
Pro Tips for Perfect Brown Every Time
- Always use a toothpick for gel coloring to control quantity.
- Mix colors in a separate bowl before adding to your recipe.
- Keep notes of ratios for future use.
- Allow frosting to rest before final adjustments.
- Build color slowly rather than adding too much at once.
Patience is key when working with brown tones.
Final Thoughts
Making brown food coloring at home is simple once you understand basic color theory and ingredient interactions. Whether you choose to mix primary colors, blend complementary tones, or use natural ingredients like cocoa and coffee, you can achieve a beautiful and customizable shade of brown.
Homemade brown food coloring offers flexibility, creativity, and control over ingredients. With practice, you’ll be able to create everything from soft beige to deep chocolate brown effortlessly.
The next time you’re decorating a cake, mixing frosting, or enhancing a savory dish, you’ll know exactly how to create the perfect brown tone using ingredients already in your kitchen.
Mastering brown food coloring isn’t just practical — it opens the door to more realistic, professional-looking, and visually stunning culinary creations.